Building a Slot-Based Custom Theme in Salesforce LWR Communities

Salesforce’s Lightning Web Runtime (LWR) Communities offers developers the flexibility to craft highly customizable, responsive, and reusable digital experiences. One of the most powerful features in LWR is the use of slots. Slots act as placeholders in a parent component where child content can be injected dynamically. This structure makes themes modular, scalable, and easy to maintain.
In this guide, we will explore how to create a slot-based custom theme, step by step, along with tips, best practices, and real-world applications.
Why Use Slots in LWR Communities?
Slots are essential for creating dynamic layouts that separate structure from content. The main advantages of using slots include:
- Reusability: Build a single theme layout and inject different content across multiple pages without rewriting the layout.
- Flexibility: Change or swap content dynamically, depending on page context, user role, or device type.
- Maintainability: Update the parent layout without affecting the child components.
- Consistency: Maintain uniform branding across all pages while allowing variation in content.
This approach ensures that your Salesforce Communities remain modern, scalable, and easier to manage as your organization grows.
Step 1: Create Your LWR Community
To start building a slot-based theme, first create an LWR Community:
- Go to Setup → Digital Experiences → All Sites.
- Click New → Build Your Own (LWR).
- Name your community, for example, SlotThemeCommunity, and click Create.
- Optionally, select a base theme to use as a starting point. This can save time for initial layout setup.
Pro Tip: Always use a sandbox environment for testing your community customizations before moving to production. This ensures smooth deployment and reduces risks.
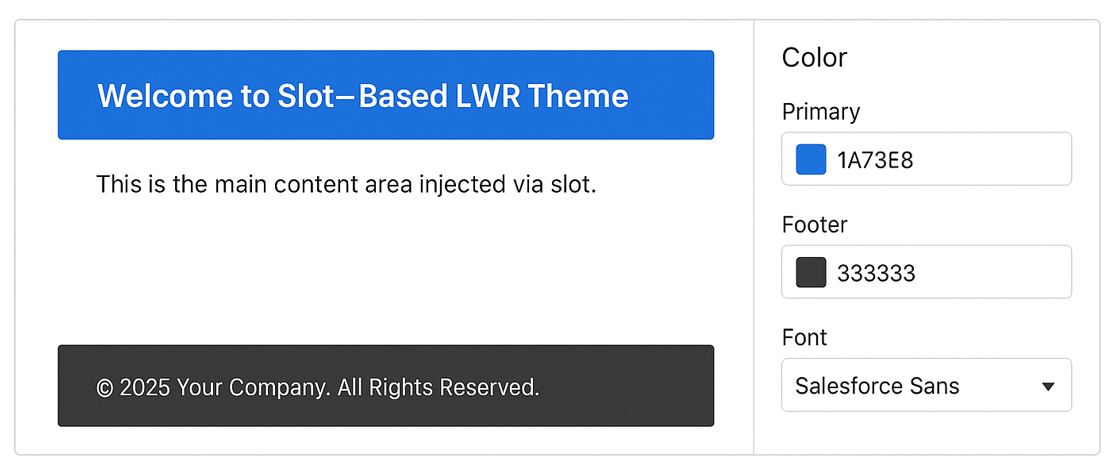
Step 2: Create a Parent Theme Component with Slots
The next step is to create a Lightning Web Component (LWC) that will serve as your theme layout. This parent component will contain slots for the header, main content, and footer.
themeLayout.html:
<template>
<header class=”header”>
<slot name=”header”></slot>
</header>
<main class=”main-content”>
<slot name=”main”></slot>
</main>
<footer class=”footer”>
<slot name=”footer”></slot>
</footer>
</template>
themeLayout.css:
.header {
background-color: var(–header-bg, #f5f5f5);
padding: 20px;
}
.main-content {
padding: 40px;
min-height: 400px;
background-color: var(–main-bg, #ffffff);
}
.footer {
background-color: var(–footer-bg, #f5f5f5);
padding: 15px;
text-align: center;
}
Pro Tip: Use CSS variables for theme colors and spacing. This allows you to switch branding or color schemes without modifying the code.
Step 3: Create Child Components for Slots
Next, create separate child components for each slot:
- Header (c-my-header): Contains navigation, logo, or hero section.
- Main Content (c-my-main-content): Holds your primary content like text, images, or cards.
- Footer (c-my-footer): Displays links, contact info, and copyright details.
Pro Tip: Keep child components modular and reusable. This ensures that they can be shared across multiple pages, reducing maintenance efforts.
Step 4: Inject Child Components into Slots
Once your parent and child components are ready, you can inject the child components into the slots:
<c-theme-layout>
<c-my-header slot=”header”></c-my-header>
<c-my-main-content slot=”main”></c-my-main-content>
<c-my-footer slot=”footer”></c-my-footer>
</c-theme-layout>
With this setup, the parent layout remains static, while the content inside each slot is dynamic.
Pro Tip: You can use different child components for different pages to create a personalized experience while reusing the same layout.
Step 5: Customize Slot Content Dynamically
Slots make it easy to change content dynamically without modifying the parent layout:
Conditional Rendering: Display different components based on user roles, login status, or device type.
<template if:true={isLoggedIn}>
<c-member-header slot=”header”></c-member-header>
</template>
<template if:false={isLoggedIn}>
<c-guest-header slot=”header”></c-guest-header>
</template>
Dynamic Styling: Use CSS variables to change colors, fonts, or spacing dynamically.
:host {
–header-bg: #0044cc;
–main-bg: #ffffff;
–footer-bg: #f0f0f0;
}
Content Swapping: Easily replace slot content for seasonal campaigns or special promotions without touching the base layout.
Step 6: Preview, Test, and Publish
Before publishing your community, it’s important to test thoroughly:
- Preview the community on desktop, tablet, and mobile devices to ensure responsiveness.
- Test slot content to confirm dynamic components load correctly.
- Adjust CSS, layout, or responsive behaviour if necessary.
- Once satisfied, click Publish to make your custom theme live.
Pro Tip: Keep a version-controlled repository for your theme components. This allows easy rollback, collaboration, and better management of updates.
Advanced Techniques for Slot-Based Themes
- Nested Slots: Use slots inside child components for more granular content injection. Useful for dashboards or multi-section pages.
- Dynamic Component Loading: Render components conditionally using <template if:true> or <template for:each> based on page data.
- Accessibility: Ensure all components meet WCAG standards, including proper ARIA labels and keyboard navigation.
- Performance Optimization: Minimize heavy scripts and large DOM structures in slot content to maintain fast load times.
- Theme Reusability: Standardize headers and footers across multiple communities to maintain consistent branding.
Real-World Use Cases
- Multi-Brand Communities: Use slots to inject brand-specific headers, footers, or hero sections while using the same parent layout.
- Role-Based Dashboards: Customize main content slots based on user roles to display relevant tools and data.
- Seasonal Campaigns: Swap content dynamically for promotions like Black Friday or Diwali without changing the base layout.
- Dynamic Landing Pages: Use nested slots to create flexible landing pages with multiple content sections.
FAQ: Slot-Based LWR Themes
Q1: Can I have multiple slots for the same type of content?
Yes, you can create multiple slots for similar sections (e.g., multiple headers or footers) and inject different components based on page context.
Q2: Can slots be nested within other slots?
Absolutely. Nested slots allow more granular control and are useful for complex layouts like dashboards or multi-section pages.
Q3: How do I handle role-based content in slots?
Use conditional rendering in LWC templates to load components based on user roles, login status, or other conditions.
Q4: Can I change slot content dynamically after page load?
Yes, using JavaScript in your child components, you can update slot content dynamically based on events or API responses.
Q5: How do CSS variables help in slot-based themes?
CSS variables allow you to change colors, fonts, and other styles globally, enabling easy branding updates without touching individual components.
Conclusion
Using a slot-based architecture in LWR Communities enables developers to create flexible, reusable, and dynamic themes. This approach separates layout from content, allowing:
- Dynamic content injection without rewriting the parent layout.
- Consistent branding across multiple pages.
- Easy customization through CSS variables and reusable components.
- Scalable designs that are maintainable and future-ready.
Implementing slot-based custom themes ensures that your Salesforce Communities are adaptable, professional, and engaging for your users, while simplifying maintenance and upgrades for developers. Partnering with an experienced Salesforce consultant in USA or a certified Salesforce development team can help you design, implement, and maintain these custom LWR themes more effectively.

Experienced Senior Salesforce Developer specializing in Apex, LWC, and system integrations. Passionate about building scalable solutions and optimizing business processes for maximum efficiency.
related blog