Simplified Salesforce and Shopify with Webhooks: A Full Integration Roadmap


There are a lot of articles and blogs across the internet about the integration of Salesforce and Shopify. But few of them convey an easier way to integrate Salesforce and Shopify — especially when it involves Salesforce Service Cloud integration via webhooks. For those who don’t know, we will also explain the term “webhook” here. However, after reading many articles, blog posts, and LinkedIn posts, and even after implementing it myself, I decided to write this in a simple manner – from scratch to completion – covering security and authentication.
The term “Webhooks”?
Webhooks are nothing but HTTP event-based, data-driven mechanisms that fetch real-time data and notify the system. To put it more simply, suppose I have one system and I want to make my website’s API public – this essentially means I am inviting other systems to integrate with mine. So, if I am making my API public and inviting other systems to integrate with my system, then I should also launch a webhook. This is because, via a webhook, whenever any change happens in my system, it will notify all the other systems integrated with it – just like a trigger in Salesforce. However, a trigger is specific to Salesforce, whereas a webhook is designed to notify all systems that have integrated with mine.
A bit about Shopify
Shopify is the online cloud-based platform which allows all business from small to giant to sell online and in person by the ecommerce store. It offers resources for setting up online shops, handling payments, keeping track of stock, and completing orders. In essence, it serves as a one-stop shop where companies can handle every facet of their online business.
Prerequisites
Before starting, ensure you have:
- A Shopify store with admin access.
- A Salesforce account (Developer or Sandbox environment).
- Familiarity with Apex programming and REST APIs.
- Access to Shopify’s Admin Panel and Salesforce’s Developer
Complete Integration Process
Step 1: Set up a Shopify Webhook
-
Go to Shopify Admin:
- Access the Admin Dashboard of your Shopify store.
- Navigate to Webhooks under Settings > Notifications.
- To create a new webhook, click Add Webhook.
-
Configure the Webhook:
- Choose an event, like Customer Creation, to initiate the webhook.
- Select JSON as the format for the payload.
- A later-created Salesforce endpoint URL will be added to the webhook.
- Save the configuration for the webhook.
-
Secure the Webhook:
- After creating webhook, you will find: “Your webhooks will be signed with a4794960************************************************58efbf0be”
- Copy the code after “Your webhooks will be signed with” — you will need this in the Apex class for security.
Step 2: Creating a simple Apex REST resource
Apex REST resource:
Apex REST resource is very useful for getting data into Apex. Let us assume that at Shopify, one customer named “Alex” has their address updated. This will be notified in Salesforce, indicating that this customer’s data has changed, and we can retrieve the updated address via the Apex REST resource. Simply, what we need to do is create a class, name it, and mark it with the annotation @RestResource.
Create a Salesforce Site + Apex REST Endpoint
Create an Apex Class name “ShopifyCustomerWebhook” and copy and paste the bellow written code.
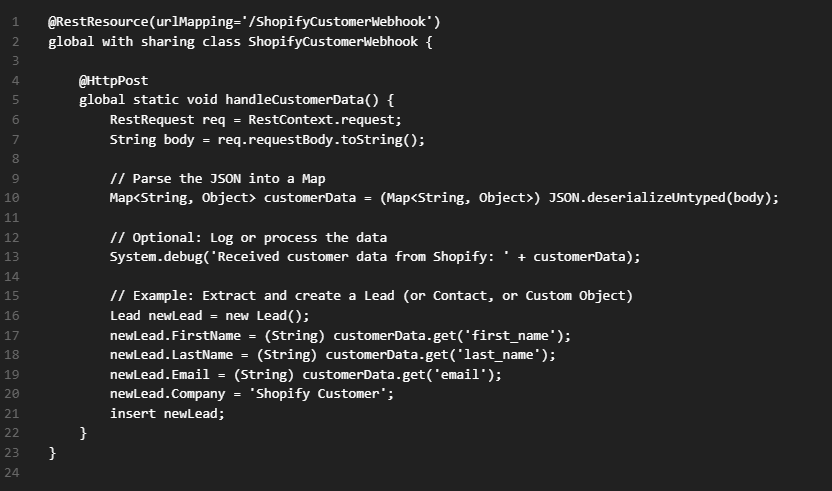
Now let’s create the site
🔹 Step 1: Enable Sites in Salesforce
- Go to Setup.
- In the Quick Find box, type Sites.
- Click Sites under Sites and Domains.
- If prompted, register a Force.com domain:
- Example:: yourcompany.force.com
- Click Check Availability → Then Register Domain.
🔹 Step 2: Create a New Site
- In the Sites page, click New.
- Fill in the form:
- Site Label: Shopify Webhook
- Site Name: ShopifyWebhook
- Site Contact: Choose your user
- Default Web Address: auto-filled (e.g., yourcompany.force.com/ShopifyWebhook)
- Active Site Home Page: Use a standard one like InMaintenance
- Check Active
- Click Save
🔹 Step 3: Update Site’s Public Access Settings
-
- On the Sites page, click the Site Label you just created (e.g., “Shopify Webhook”).
- Click the button Public Access Settings.
This opens the Guest User Profile for your Site.
- Scroll to Enabled Apex Class Access → Click Edit.
- Select your ShopifyCustomerWebhook class and move it to the Enabled column → Click Save.
🔹 Step 4: Get the Endpoint URL
Your final Shopify webhook endpoint will be:
https://yourcompany.force.com/services/apexrest/ShopifyCustomerWebhook Replace yourcompany with your domain, and /ShopifyCustomerWebhook with your Apex class’urlMapping.
Step-by-Step: Add HMAC Security to Apex Webhook:
Congratulations! You have created a Shopify and Salesforce integration via a webhook. Now, every time the customer is edited, it will be reflected in Apex in Salesforce. One point worth noting here is that our site is going to be publicly available, so unauthorized access could occur. To prevent this, we need to set up security so that no unauthorized access can take place. Just follow some simple steps.
At line no 8 copy and paste the bellow given code:
// Get the Shopify HMAC from header
String shopifyHmac = req.headers.get(‘X-Shopify-Hmac-Sha256’);
// Your webhook secret (store securely in production!)
String secret = ‘your_shopify_webhook_secret’;
// Compute HMAC
Blob key = Blob.valueOf(secret);
Blob data = Blob.valueOf(requestBody);
Blob mac = Crypto.generateMac(‘HMACSHA256’, data, key);
String computedHmac = EncodingUtil.base64Encode(mac);
// Validate
if (computedHmac != shopifyHmac) {
System.debug(‘Invalid HMAC – possible spoofed request.’);
throw new AuraHandledException(‘Unauthorized’);
}
In ‘your_shopify_webhook_secret’, replace the code with the one I told you to keep safe for later use in the Apex class.
Your job is done. To check the security, you can simply try to make changes via Postman through the site we created. It won’t allow you to make any changes.
Summary:
Easily connect Shopify and Salesforce with webhooks protected by HMAC authentication. This configuration guarantees real-time data synchronization, such as order changes, while confirming each request’s legitimacy. An ideal combination of security and automation for contemporary e-commerce processes.

Seasoned Senior Salesforce Developer with deep expertise in Apex, Lightning Web Components (LWC), and complex integrations. Proven track record of delivering scalable, high-performance solutions and optimizing business processes to drive efficiency and growth.