SFMC API with Postman: A Practical Guide for Salesforce Marketing Cloud Developers

Introduction:
Salesforce Marketing Cloud is a powerhouse for customer engagement, but its true potential often lies beyond the clicks and configurations of the UI. For developers, the SFMC API is the key to unlocking advanced automation, integrating with external systems, and building truly bespoke marketing solutions.
However, diving into APIs can feel daunting. That’s where Postman comes in. Postman is an intuitive API platform that simplifies the process of building, testing, and documenting APIs. This guide will walk Salesforce Marketing Cloud developers through using Postman to interact with the SFMC API, making your development workflow smoother and more efficient.
Why Postman for SFMC API Development?
Before we dive into the “how,” let’s quickly cover the “why”:
- Ease of Use: Postman provides a user-friendly interface for constructing API requests without writing a single line of code.
- Authentication Handling: Manage complex OAuth 2.0 authentication flows with ease, storing tokens for reuse.
- Environment Variables: Seamlessly switch between different SFMC instances (e.g., Sandbox, Production) without re-entering credentials.
- Collections: Organize your API calls into logical groups for different projects or API types (REST, SOAP).
- Testing & Debugging: Quickly send requests, inspect responses, and troubleshoot issues.
- Collaboration: Share your API collections with team members, ensuring consistency.
Step 1: Setting Up Your SFMC API Integration:
Before you even open Postman, you need to set up an “Installed Package” in your Marketing Cloud account. This is your gateway to the API.
- Navigate to Setup: In Marketing Cloud, go to Setup > Platform Tools > Apps > Installed Packages.
- Create New Package: Click “New” and give your package a descriptive name (e.g., “Postman API Access”).
- Add Component: Once saved, click “Add Component” and select “API Integration.” Choose “Server-to-Server” as the Integration Type.
- Configure API Scopes: This is crucial! Select the necessary API permissions based on what you intend to do (e.g., “Audiences: Read” and “Audiences: Write” for Data Extension interactions, “Email: Read” and “Email: Send” for transactional emails). Granting too many permissions is a security risk.
- Save and Note Credentials: Save your component. You’ll then see your Client ID, Client Secret, Authentication Base URI, and REST Base URI. Keep these secure – you’ll need them for Postman!
Step 2: Configuring Postman Environment (Your API Workspace):
Environments in Postman allow you to store variables (like your API credentials) that can be reused across multiple requests and easily swapped for different SFMC instances.
- Create a New Environment: In Postman, click the “Environments” tab on the left sidebar and then the “+” icon or select “New Environment” from the environment dropdown at the top right.
- Add Variables: Name your environment (e.g., “SFMC Dev Org”). Add the following variables:
- sfmc_client_id: Your Client ID from the Installed Package.
- sfmc_client_secret: Your Client Secret.
- sfmc_auth_base_uri: The Authentication Base URI (e.g., https://YOUR_SUBDOMAIN.auth.marketingcloudapis.com).
- sfmc_rest_base_uri: The REST Base URI (e.g., https://YOUR_SUBDOMAIN.rest.marketingcloudapis.com).
- sfmc_soap_base_uri: For SOAP API calls, this is typically https://YOUR_SUBDOMAIN.soap.marketingcloudapis.com/Service.asmx.
- sfmc_mid (Optional, but recommended for multi-BU accounts): Your Marketing Cloud Account ID (MID).
- sfmc_access_token: Leave this empty (it will be populated by our authentication call).
- Important: For sensitive information like Client Secret, use the “secret” type or Postman Vault. For demo purposes, you might use “default,” but always be mindful of security.
- Set as Active: Select your newly created environment from the dropdown menu at the top right of Postman.
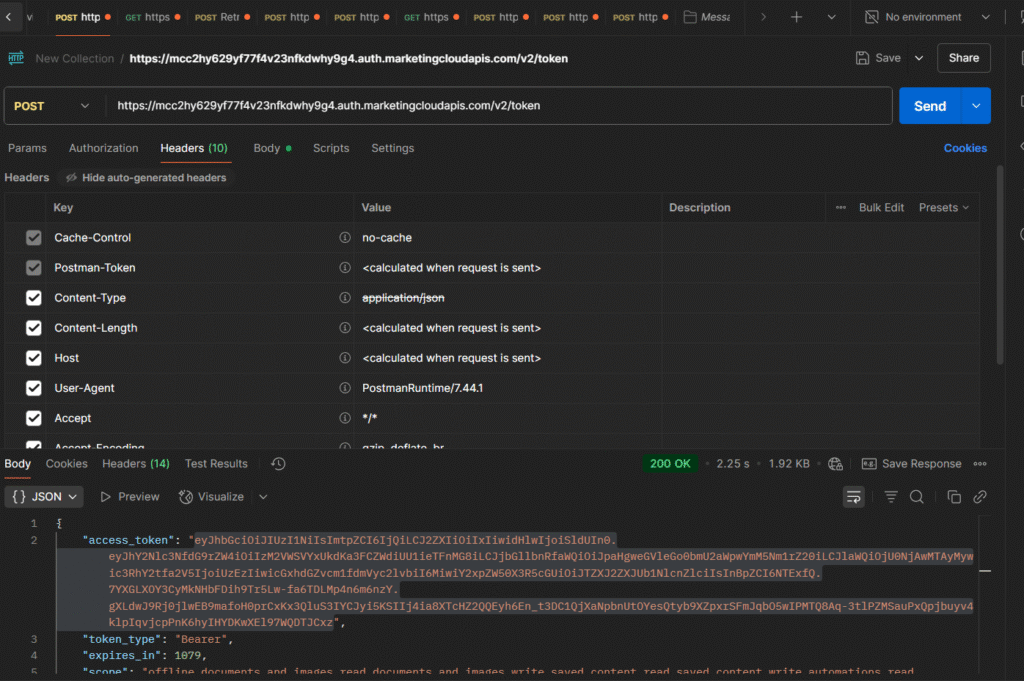
Step 3: Authenticating with SFMC API (Getting Your Token):
SFMC APIs use OAuth 2.0 for authentication. You’ll request an access token that is valid for 20 minutes.
- Create a New Request: In your Postman workspace, click the “+” tab to create a new request.
- Request Details:
- Method: POST
- URL: {{sfmc_auth_base_uri}}/v2/toke
- Headers: Content-Type: application/json
Body (raw, JSON):
JSON
{
“grant_type”: “client_credentials”,
“client_id”: “{{sfmc_client_id}}”,
“client_secret”: “{{sfmc_client_secret}}”,
“account_id”: “{{sfmc_mid}}”
} - Pre-request Script: To automatically refresh your token, add a Pre-request Script. This script checks if the token is expired and requests a new one if needed.Script Example (basic token storage):
JavaScript
// Basic script to store the access token in an environment variable// For production use, consider a more robust token refresh logic
pm.test(“Status code is 200”, function () {
pm.response.to.have.status(200);
});
var jsonData = pm.response.json();
pm.environment.set(“sfmc_access_token”, jsonData.access_token);
pm.environment.set(“sfmc_token_expires_at”, Date.now() + (jsonData.expires_in * 1000)); // Store expiration time - Send Request: Click “Send.” If successful, you’ll get a 200 OK response with an access_token in the body.
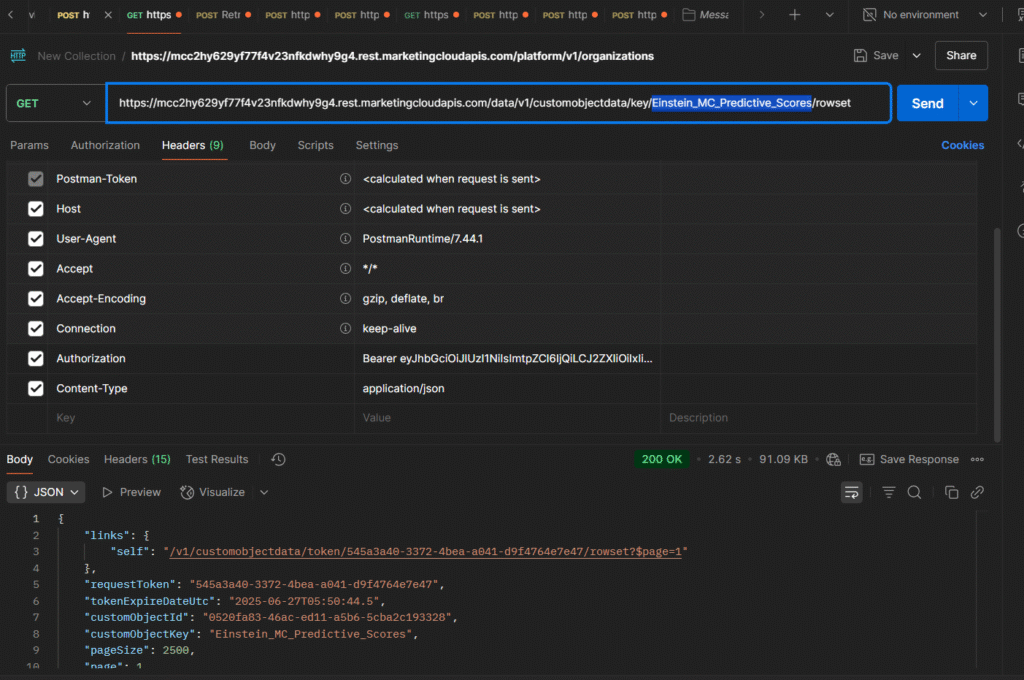
Step 4: Making Your First REST API Call:
Now that you have an access token, you can start interacting with SFMC data.
- New Request: Create another new request in Postman.
- Request Details:
- Method: GET
- URL: {{sfmc_rest_base_uri}}/data/v1/customobjectdata/key/External key/rowset
- Headers:
- Content-Type: application/json
- Authorization: Bearer {{sfmc_access_token
3.Send Request: Click “Send.” You should receive a JSON response listing your Data Extensions.
Step 5: Working with Data Extensions (Practical Use Case):
Let’s put it into practice by adding a record to a Data Extension (DE).
Real-World Scenario: A company, ‘Eventify’, uses SFMC for event registrations. They have an external landing page built on their website. When a user registers, they want to immediately push that data into a specific SFMC Data Extension to trigger a welcome email journey.
- Create a Triggered Send Data Extension in SFMC:
- Go to Email Studio > Email > Subscribers > Data Extensions.
- Create a new Standard Data Extension. Check “Is Sendable” and “Is Testable.” Set your Subscriber Key as the Sendable Relationship. Add fields like EmailAddress, FirstName, LastName, EventName, RegistrationDate. Make sure SubscriberKey is a primary key.
- Note its External Key (e.g. Einstein_MC_Predictive_Scores ).
- Prepare Postman Request to Add Data to DE:
- Method: POST
- URL: {{sfmc_rest_base_uri}}/hub/v1/dataeventsasync/key:{{Your_DE_External_Key}}/rowset
- Replace {{Your_DE_External_Key}} with your actual DE’s external key.
- Headers:
- Content-Type: application/json
- Authorization: Bearer {{sfmc_access_token}}
Body (raw, JSON):
JSON
[
{
“keys”: {
“SubscriberKey”: “unique-user-id-001”
},
“values”: {
“EmailAddress”: “john.doe@example.com”,
“FirstName”: “John”,
“LastName”: “Doe”,
“EventName”: “Annual Marketing Summit”,
“RegistrationDate”: “2025-06-24T14:30:00Z”
}
},
{
“keys”: {
“SubscriberKey”: “unique-user-id-002”
},
“values”: {
“EmailAddress”: “jane.smith@example.com”,
“FirstName”: “Jane”,
“LastName”: “Smith”,
“EventName”: “Annual Marketing Summit”,
“RegistrationDate”: “2025-06-24T14:35:00Z”
}
}
] - Send Request: Click “Send.” You should get a 202 OK response if successful. Verify the data in your SFMC Data Extension.
Step 6: Exploring SOAP API:
While REST is more modern, the SOAP API is still essential for many legacy and specific functionalities in SFMC (e.g., retrieving send statistics, managing subscribers in lists, or complex automation tasks).
- New Request: Create another new request.
- Request Details:
- Method: POST
- URL: {{sfmc_soap_base_uri}} (e.g., https://YOUR_SUBDOMAIN.soap.marketingcloudapis.com/Service.asmx)
- Headers:
- Content-Type: text/xml
- SOAPAction: Retrieve (or the specific SOAP action for your request)
Body (raw, XML):
XML
<s:Envelope xmlns:s=”http://www.w3.org/2003/05/soap-envelope” xmlns:a=”http://schemas.xmlsoap.org/ws/2004/08/addressing” xmlns:u=”http://docs.oasis-open.org/wss/2004/01/oasis-200401-wss-wssecurity-utility-1.0.xsd”>
<s:Header>
<a:Action s:mustUnderstand=”1″>Retrieve</a:Action>
<a:To s:mustUnderstand=”1″>{{sfmc_soap_base_uri}}</a:To>
<fueloauth xmlns=”http://exacttarget.com”>{{sfmc_access_token}}</fueloauth>
</s:Header>
<s:Body xmlns:xsi=”http://www.w3.org/2001/XMLSchema-instance” xmlns:xsd=”http://www.w3.org/2001/XMLSchema”>
<RetrieveRequestMsg xmlns=”http://exacttarget.com/wsdl/partnerAPI”>
<RetrieveRequest>
<ObjectType>DataExtensionObject[Your_DE_External_Key]</ObjectType> <Properties>EmailAddress</Properties>
<Properties>FirstName</Properties>
<Properties>LastName</Properties>
<Filter xsi:type=”SimpleFilterPart”>
<Property>SubscriberKey</Property>
<SimpleOperator>equals</SimpleOperator>
<Value>unique-user-id-001</Value>
</Filter>
</RetrieveRequest>
</RetrieveRequestMsg>
</s:Body>
</s:Envelope>

Tips for SFMC API Development with Postman:
- SFMC API Official Collection: Salesforce provides an official Postman collection for Marketing Cloud APIs, which is especially useful for teams delivering Salesforce Marketing Cloud services to clients at scale. This is a great starting point, pre-configured with many common requests. Search for “Salesforce Marketing Cloud APIs” in the Postman Public API Network.
- Error Handling: Pay close attention to the HTTP status codes and the error messages in the response body. They are your best friends for debugging.
- Documentation: Always refer to the official Salesforce Marketing Cloud API documentation for detailed endpoint information, required parameters, and response structures for both REST and SOAP APIs.
- Governor Limits: Be mindful of API limits. Avoid making excessive or poorly optimized calls in production environments.
Conclusion: Empowering Your SFMC Development Workflow
Mastering the SFMC API with Postman is an indispensable skill for any Salesforce Marketing Cloud developer. It empowers you to:
- Automate Tedious Tasks: From data imports to content updates.
- Build Seamless Integrations: Connect SFMC with your CRM, e-commerce, or custom applications.
- Enable Real-time Personalization: Trigger journeys and update profiles based on live interactions.
- Accelerate Development: Rapidly test and debug your API logic.
So, Install Postman, set up your environment, and start exploring the vast possibilities of the Salesforce Marketing Cloud API. Your journey towards more powerful and flexible marketing solutions begins.

Nihar Sharma is the Co-Founder and CEO, driving innovation, growth, and customer success. With expertise in business strategy and technology, he leads digital transformation and builds scalable solutions, delivering long-term value for clients.
related blog